MaxAssist® Announcement Creator
The MaxAssist® Announcement Creator is a great way to craft dynamic, attractive, and interactive emails about an event or special service your practice may be offering, or to communicate important updates such as holiday closures.
To create a new announcement, navigate to your MaxAssist® Dashboard, select Announcements under the Engagement menu (1), and select the Create New button (2).
Any previously created announcements will be visible here (3)

For this example, we’re going to create a custom layout announcement encouraging patients to book their upcoming appointments before summer break.
Start by entering the announcement name(1) and then click on Custom Layout (2).
Important note:
If you’re using a marketing piece, the document will be embedded in the message. not be sent as an attachment.

Now you’ll see your Layout (1) and Sections (2) and Header and Footer. We’re creating a single topic announcement so we’ll click and drag the 1 Topic section over to the layout. You can add more than one section and remove sections by clicking the garbage can icon.
When you’re happy with your layout, click Next (3)

Along the top of this next page, you’ll see the 5 navigation buttons.
These are the steps you’ll follow to design, build and schedule the delivery of your announcement.
If you wish to change any of your design elements, you can always go back to a previous element by clicking on that navigation item.

On this Style page, you’ll be able to choose the colors for your announcement (1).
You can also customize individual sections such as background, header, footer, and border, by clicking on that element (2).

Since this is a summer themed message, we’ll choose White as the Color Palette from the drop-down menu (1) and cool color (2). We’ll also change our font to Verdana (3). This is where you can also select a background color or image (4).
When you’re happy with your Style, click Next (5).

That takes you to the Content/Image page.
You can upload and edit an image from your computer by selecting Custom Image (1) but for this example, we’ll select Default Images->Seasons->Summer Tour (2) to go with our summer theme.
You’ll also see 2 additional options to Edit Image and Add/Edit Text on Image (3).

We clicked the Add/Edit Text on Image button and added the text “Wait, before you leave… text.
You can also adjust the color, font color, size, opacity, and style. Click save and…

…we’re back to the Content/Images page and the image and added text is displayed in the layout (1).
Now let’s finish the message by clicking on the text area below the image (2)

First, we’ll add a custom tag to add the patient’s first name to the message (1) and then add the text. Since we’ve mentioned a button we’ll add one by clicking the Show Button(s) below option (2).

Now, we need to configure the button.
Start by clicking on the button (1) which brings up the options panel on the right. (2) Here you can customize the alignment of the button, font, and font size.

Since this is a Book Appointment button, we’ll add the text (1), the link (URL) you want the user to see once the button is pressed). (2) and then pick complementary colors from the image for the text and background colors (3). Then we can click the Next button to go to the Footer page.

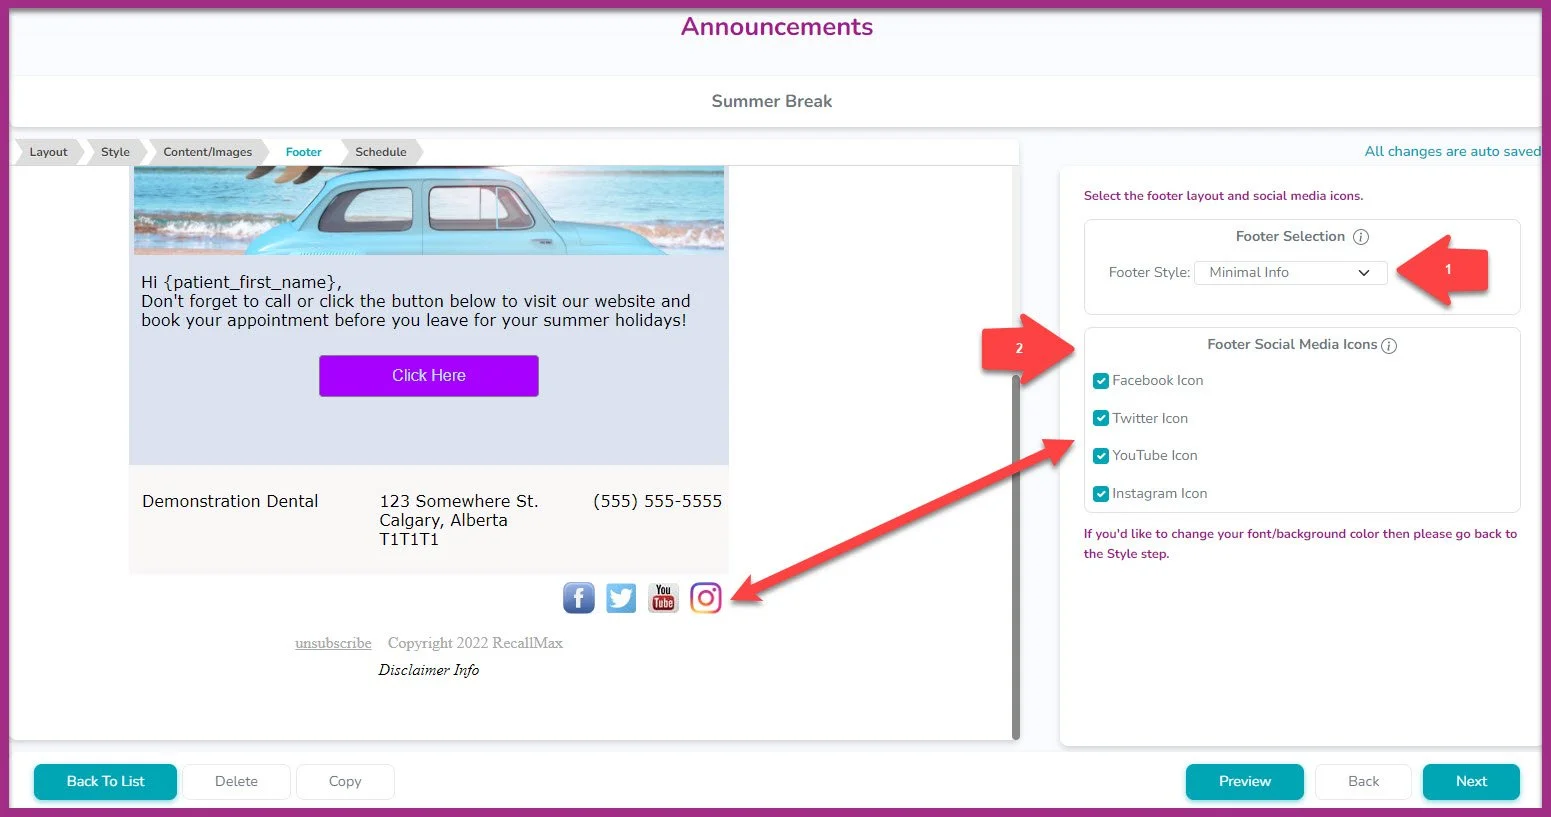
On this page, you can customize your footer style to display different information (1) and select the social media icons you want to be displayed in your announcement (2).
Looking good! Now that we’re all done with editing the announcement, we can click the Next button again to go to the Schedule page where we can get the announcement all set to send out to your patients.
This is where you’ll be able to add a Description (1) (for your reference only), define who you want the announcement Sent o (2), and Patient Age range (3).
You can also specify delivery to patients of Selected Providers (4) Email Subject (5), Send Date and Time (6),
Remember you can also Preview or do a Send Test to yourself by clicking the buttons at the bottom of the page (7).
When you’re ready to proceed, click the Ready to Send button.

Please be sure to read the compliance notice and then click
Send Announcement!
That’s it, you’re done!

You’ll then be taken to the Announcements List page to view a list of your announcements and other vital information including Status, Send Date, number of Opens, etc,. By clicking on the 3 dots you’ll be able to choose to Edit or Delete an incomplete announcement, or copy and existing announcement.
Clicking on the drop-down menu allows you to filter the View of your announcements for easier navigation.

To view a complete video tutorial of this new feature, please click here.
For more information on this or any of our features, please reach out to us.
Phone: 1-800-651-8603 ext 1,
email: support@getmaxassist.com
Live text chat at www.getmaxassist.com
Thanks for using MaxAssist®!