Customizing Automated Patient Messages
At MaxAssist®, we understand that the unexpected happens! You need to adapt quickly to changing circumstances to best serve your patients, and we can help you do just that by giving you the power to enable and disable automated patient messages, as well as preview and even edit those messages! Read on to see how easily and quickly you can customize your automated messages.
Navigate to your MaxAssist® Dashboard from your Toolbar (Settings and Support-> Practice Management->View Dashboard Reports or click here to log in directly. Note: Only practice administrators have access to the MaxAssist® Dashboard.
Select Patient Messages under the Settings menu.

On the left-hand side of the Auto Message Overview window, you’ll see all of the automated patient messages. Those with checkmarks are activated for your practice.
Enabling or disabling these messages is as easy as placing or removing the checkmarks!

Click on a message to open previews on the right-hand side of the Auto Message Overview Window. The Edit Wording buttons give you the ability to customize your messages by adding verbiage.

If you select the Edit Wording button for the Text version, a window will open where you can add additional information (1). Your changes will be previewed live on the right (2). Once you are finished, select the save button to apply your changes (3).
Note: Hard-coded information such as patient name and appointment details can not be edited.

There is a character limit, so please pay attention to the countdown at the bottom of the window.

If you select the Edit Wording button for the Email version, you’ll see that you have the option to:
Add Wording After Greeting
Add Wording Before Signature
Add Wording After Signature

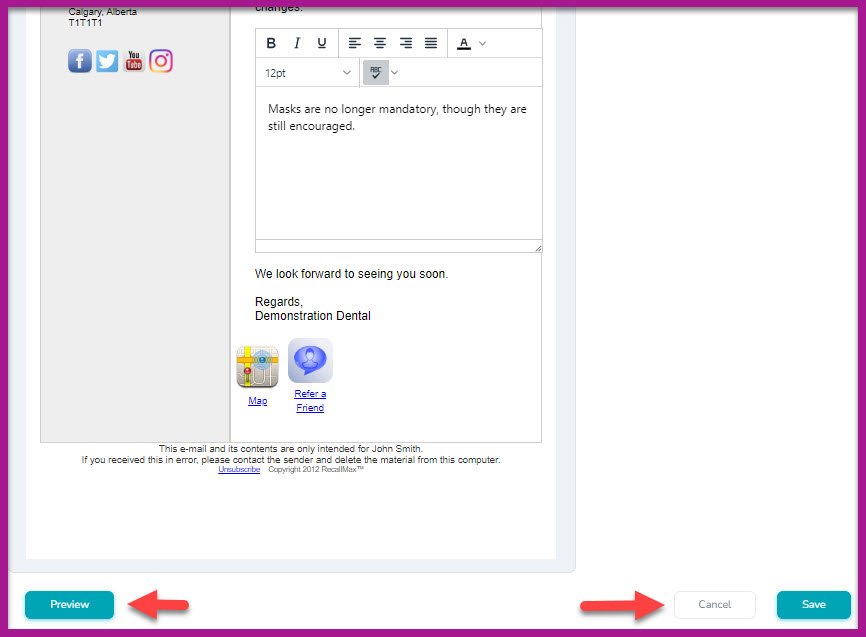
For this example, we’ll select Add Wording Before Signature (1) and add a note about COVID-19 protocols at the practice (2).

Select Save, Cancel, or Preview at the bottom of the page.
Let’s say you wanted to add the same message to your One Week list. It’s easy! You don’t have to type in the same message again, we have a built-in clipboard to lend a hand.
Select the One Week Message (1) and select Edit Wording button (2).

Again, you’ll click Add Wording Before Greeting (1) and this time, select the Copy From (2) button.

Now a window pops up with the option to select the previously added text (1).
Clicking OK will paste that same message into this One Week message (2).
Save your changes to the One Week message and you’re all done!

When you preview the Day of Appointment messages, you’ll notice a toggle in the upper right corner of the preview window.


This toggle enables our Virtual Waiting Room feature. Once selected, you’ll see the check-in instructions have been added to your Day of Appointment messages.
Our Birthday Email messages allow you to take customization a step further by choosing from our gallery of fun images to include with the fully customizable birthday greeting. What a great way to show patients you’re thinking about them on their special day!


On this editing page, you can select from various Birthday Cards (1), customize the wording of the message (2) and even format your text and insert custom tags (3).
Here, we’ve selected the Cool Llama card - and come on, who doesn’t like Llamas?!

At the bottom of this editing page, you can Preview, Save, Cancel, or Reset to default content.
For more information on these or any of our features, please reach out to us.
Phone: 1-800-651-8603 ext 1,
email: support@getmaxassist.com
Live text chat at www.getmaxassist.com
Thanks for using MaxAssist®!